
 By Lee Eugene
Few kitchen centerpieces match the tactile warmth of a solid butcher block island. Whether constructed from edge-grain hard maple, rich walnut, or durable white oak, a well-conditioned timber slab softens the cold expanses of stainless steel and quartz that dominate modern kitchens. Yet that organic beauty comes with a non-negotiable trade-off: wood is an active, porous medium. Exposed to daily food prep, steam, citrus acids, and frequent soapy wipe-downs, its protective saturation steadily washes away.
When butcher block starves for moisture, it signals its distress clearly. The deep amber glow dulls into a chalky, pale gray patina. Smooth fibers raise, turning the surface raspy to the touch, and water droplets from freshly washed produce flatten and soak in rather than beading up. Left unchecked, chronic dehydration pulls the glue joints apart and induces stress cracks along the timber ends.
Restoring a dry butcher block island does not require professional woodshop machinery. It demands the right sequence of gentle decontamination, grain preparation, and deep saturation using non-drying, food-safe conditioning agents.
Diagnosing Wood Dehydration: Beyond the Surface Fading
Before reaching for any bottle or rag, inspect the slab closely to understand the extent of the dry-out. The simplest test is the water droplet test: place a few droplets of tap water across high-traffic zones—particularly around prep stations and near the sink perimeter if your island features an undermount basin. If the water holds a tight, rounded bead for several minutes, the protective seal remains partially intact. If the droplets spread out and vanish into the grain within thirty seconds, the timber is parched down to its core.
Examine the surface for tactile damage as well. Run your bare palm across the workspace against the grain. If you feel raised wood fibers—often called “whiskers”—the wood cells have repeatedly absorbed water and dried out unevenly. Check for dark, oxidized stains from damp cast iron cookware, gray water rings, and shallow scoring from utility knives. Knowing whether your island simply needs an oil bath or requires localized sanding will save you from sealing dirt and blemishes beneath fresh oil.
Selecting the Correct Restorative Mediums
The most common mistake homeowners make when reviving dry butcher block is grabbing whatever cooking oil sits in their pantry. Olive oil, vegetable oil, corn oil, and canola oil are unsaturated fats that oxidize over time. When rubbed into raw wood fibers and exposed to air, these oils break down, turn rancid, and emit a sticky, sour odor that permeates the kitchen and contaminates food prep.
The Food-Grade Mineral Oil Standard
Your foundation coat should always be pure, food-grade mineral oil. Unlike plant-derived oils, mineral oil is an inert, odorless petroleum derivative that will never spoil, turn tacky, or support bacterial growth. It possesses a low viscosity that allows it to travel deep into capillary grain pores, rehydrating the interior fibers and suppling the timber from the inside out. Look for mineral oil certified by the United States Pharmacopeia (USP), which guarantees it is completely free from impurities and safe for direct food contact.
The Protective Power of Wax Pastes
While mineral oil hydrates deep inside the timber, it cannot form a durable surface barrier on its own. Because it is a non-drying oil that never hardens into a film, liquid spills and frequent cleanings will gradually draw it back out.
To lock in that hydration, follow the oil treatment with a dedicated butcher block conditioner, often sold as board cream or wood butter. These formulations combine food-grade mineral oil with melted beeswax and carnauba wax. As the paste is worked into the surface and buffed, the waxes harden inside the open pores near the exterior face, leaving behind a water-repellent, silky barrier that resists liquid penetration far better than oil alone.
Surface Preparation: Deep Cleaning and Grain Smoothing
Applying conditioner over an unwashed or contaminated slab traps bacteria and stains beneath the protective layer. The preparation phase resets the timber to an even, receptive baseline.
Begin by scrubbing the island thoroughly with warm water and a mild, plant-based dish soap using a non-abrasive sponge. Do not flood the surface; excess water is the very enemy you are working against. Wring the sponge out damp, scrub away any stubborn food residue, and wipe the entire surface dry with clean microfiber towels immediately.
For stubborn discoloration, avoid chlorine bleach, which damages wood lignin and leaves unsightly pale patches. Instead, scatter a generous handful of coarse sea salt or kosher salt over the stained area, cut a fresh lemon in half, and use the cut side as a scrubbing pad. The citric acid cuts through grease and brightens dull spots while the salt crystals lift surface grime without scratching the wood. Wipe clean with a barely damp cloth and allow the island to air-dry completely for at least twelve hours before applying oil.
If the wood fibers feel raised or rough, take a sheet of 220-grit sandpaper wrapped around a hard sanding block and sand lightly, working strictly parallel to the direction of the wood grain. Never sand across the grain, which creates unsightly cross-scratches that absorb excess oil and show up as dark marks. Sanding with 220-grit smooths down rough fibers without burnishing the wood pores shut, leaving an ideal tooth for oil absorption. Vacuum away the fine wood dust and wipe the slab with a dry tack cloth.
The Saturation Sequence: Deep-Oiling Step by Step
Rehydrating a long-neglected island is not a single-coat task; it requires patient saturation. Because dry timber acts like a dense bundle of straws, initial coats will vanish into the wood within minutes.
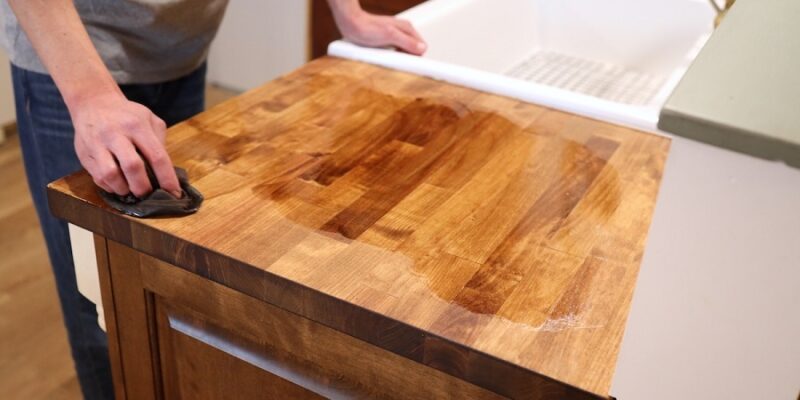
Pour a generous pool of USP mineral oil directly onto the center of the butcher block island. Using a clean lint-free cotton rag, shop towel, or clean microfiber cloth, spread the oil across the entire top surface, maintaining an even, wet sheen. Pay special attention to the perimeter edges and the underside overhang, which dry out faster due to ambient airflow.
If your island features an exposed end-grain construction—resembling a checkerboard pattern—it will drink substantially more oil than edge-grain boards. End-grain surfaces reveal the open capillary tubes of the wood fibers, pulling liquid downward at rapid speed. Keep adding oil until the entire surface remains visibly glistening wet without absorbing dry spots for at least twenty minutes.
Allow the slab to sit undisturbed for two to four hours, letting capillary action pull the oil deep into the timber. After several hours, inspect the island. You will likely see patchy areas where the oil soaked in completely alongside pools of excess liquid. Using fresh cotton towels, buff away all unabsorbed oil until the surface feels smooth and supple rather than greasy or slick.
For an island that has gone months or years without maintenance, repeat this oiling step once a day for two consecutive days. When a fresh application of oil sits on the surface for two hours without sinking in anywhere, the interior fibers have reached total saturation.
Locking the Surface: The Wax Barrier and Final Buff
Once the interior grain is thoroughly hydrated and the residual oil is wiped clear, it is time to establish a moisture barrier using your wax-infused conditioner.
Scoop a tablespoon-sized portion of butcher block conditioner onto the wood. Using a dry cotton rag, work the paste into the timber using tight, circular motions. The friction created by circular buffing softens the beeswax and carnauba wax, allowing them to flow into the microscopic crevices of the grain. Cover the entire perimeter, taking care to coat the rim, the corners, and the front face of any sink cutouts.
Let the wax paste haze over for roughly thirty to forty-five minutes. Once the wax cools and solidifies, take a fresh, clean cotton cloth and buff the surface vigorously, working in long strokes along the grain line. The friction will burnish the hardened wax into a lustrous, water-resistant satin sheen. When finished, the wood should feel silky beneath your fingertips with zero lingering stickiness.
Maintenance Protocols for a Working Island
Restoring a dehydrated butcher block brings it back to showroom condition, but preserving that finish depends on sensible everyday kitchen routines.
-
Dry standing water immediately. Never allow wet cutting boards, soggy dish towels, or condensation-heavy mixing bowls to rest on the wood surface for extended periods. Standing moisture will inevitably work its way through the wax barrier and cause localized swelling.
-
Avoid harsh chemical cleaners. Degreasers, bleach-based sprays, and abrasive scouring pads strip away wax and oil finishes in a single wipe. Clean the surface daily with nothing stronger than a warm, damp microfiber cloth and a mild pH-neutral soap.
-
Establish a seasonal conditioning cadence. Timber movement tracks with the seasons. As indoor heating kicks on in late autumn and dries out household air, wood loses moisture rapidly. Reapply a maintenance coat of mineral oil and wax conditioner every four to six weeks, or whenever water drops stop beading on the surface.
A butcher block island is one of the few kitchen features that can continually renew itself. Rather than aging into obsolescence, solid wood rewards consistent care with deeper character and an enduring, rich warmth that synthetic countertops can never replicate.
What is your reaction?
Excited
0
Happy
0
In Love
0
Not Sure
0
Silly
0