 By Lee Eugene
Few simple home maintenance tasks turn hazardous as quickly as changing a light bulb, only to hear a brittle pop and find yourself holding a shattered glass globe while the threaded metal base remains welded inside the fixture. It is an aggravating scenario that happens regularly with older incandescent bulbs, heat-stressed halogen lamps, and budget LED retrofits whose bases have seized in place.
Faced with a jagged ring of razor-sharp glass and live electrical contacts, many homeowners either hesitate or grab whatever makeshift tool is nearby, risking serious lacerations or electrical shock. Removing a stuck bulb base is fundamentally a mechanical problem with an essential electrical prerequisite. With the right sequence of actions, a controlled touch, and basic safety precautions, you can extract the stubborn collar in minutes without damaging the fixture or visiting urgent care.
De-Energizing the Circuit: Why the Wall Switch Is Not Enough
The first and most critical mistake people make when dealing with a broken socket is relying on the wall switch. Flipping a switch to the off position interrupts the circuit, but in many residential wiring configurations—particularly in older homes or unpermitted DIY renovations—the switch may only break the neutral leg rather than the hot leg. In other scenarios, multi-way switch loops or smart switches can allow small amounts of current to linger at the fixture. If a metal tool contacts the brass center tab inside the socket while you are grounded, the consequences are immediate and dangerous.
Always cut power at the main breaker panel. Locate the breaker controlling the room or fixture, flip it fully to the off position, and tape over the switch if others are in the home so nobody flips it back on while you are working. For plug-in desk or floor lamps, simply unplugging the cord from the wall outlet isolates the unit completely.
Before touching the fixture, confirm that the circuit is dead using a reliable non-contact voltage tester. Place the sensor tip directly against the fixture housing and near the mouth of the socket. If the tester remains silent and dark, you have confirmed zero voltage.
Personal protection is just as essential as electrical safety. Put on a sturdy pair of leather work gloves or cut-resistant gloves rather than thin latex, and wear clear safety glasses to shield your eyes from falling glass dust. Lay a thick drop cloth, canvas tarp, or old bath towel directly underneath the fixture to catch stray fragments during removal.
Inspecting the Remaining Base
Take a bright flashlight and look directly into the socket to assess what structural material remains. Light bulbs generally fail in one of two ways.
In the first scenario, the center glass mount and filament support wires remain intact inside the metal threaded base. This glass post provides a convenient center point that can offer leverage for extraction.
In the second scenario, the entire interior glass assembly has broken away, leaving behind nothing more than a hollow, jagged cylinder of aluminum or brass threaded tightly against the socket walls.
Understanding what remains dictates which technique to use. If the bulb was installed years ago, you may also see slight white oxidation along the threads. This galvanic corrosion creates high friction between the aluminum bulb base and the brass socket lining, meaning you need positive mechanical purchase rather than gentle surface contact to back it out.
The Mechanical Standard: Needle-Nose Pliers
When it comes to speed, precision, and clean mechanical leverage, a standard pair of long needle-nose pliers is the most reliable tool for the job.
Extracting with the Central Glass Mount Intact
If the inner glass stem is still anchored to the base, grip it firmly with the tips of your needle-nose pliers. Turn the pliers counterclockwise with steady, deliberate torque. In many instances, the internal glass is anchored securely enough to the brass base that the entire assembly will unthread cleanly. Be careful not to apply sideways pressure, which will snap the glass stem and leave you with an empty shell.
The Reverse-Spread Technique
If the center glass has shattered away completely, trying to grab the thin metal rim from the outside often tears the metal without turning the base. A far better method is the internal expansion technique:
-
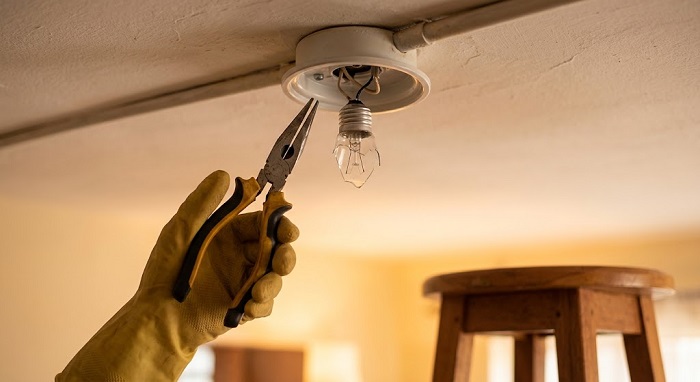
Insert the tips of the needle-nose pliers into the center of the hollow metal base in their closed position.
-
Once the tips are fully inside the cylinder, pull the plier handles apart so the jaws expand outward against opposite sides of the threaded metal shell.
-
While maintaining outward pressure against the inner walls of the base, rotate the entire plier assembly counterclockwise.
The outward friction catches the ridges of the screw threads and backs the stuck collar out smoothly without deforming the socket housing.
Practical Household Workarounds
If you do not have needle-nose pliers on hand or the fixture is recessed too deeply inside a narrow recessed can, several everyday household items make effective extractors.
The Raw Potato Technique
The raw potato trick has earned its reputation because firm, starchy flesh molds effortlessly over irregular, sharp edges. Cut a medium raw potato in half crosswise. Use a paring knife to shape the cut end into a blunt cylinder roughly matching the diameter of the bulb socket.
Press the carved potato firmly against the jagged glass and metal base, pushing straight into the socket. The sharp fragments will embed themselves deeply into the potato flesh, creating a custom mechanical grip. Keep steady inward pressure on the potato while slowly rotating it counterclockwise. The base will back out embedded in the potato.
Because potatoes contain moisture, verify that the breaker is shut off before attempting this method. Once the base is free, wipe out the socket with a dry cloth and let any residual moisture evaporate fully before restoring power.
The Carved Wine Cork
For sockets where the glass has completely fallen out, a standard natural wine cork makes an exceptional extraction tool without introducing any moisture. Carve the bottom quarter-inch of the cork into a slight taper using a utility knife. Press the tapered end firmly into the center of the metal cylinder until it wedges tightly against the interior threads. Once fully seated, twist the cork counterclockwise. The dense, pliable cork will grip the corrugated metal and spin the stuck base out cleanly.
Resolving Corroded and Seized Sockets
Occasionally, an older bulb has been run hot for thousands of hours, welding the base to the fixture threads. If you apply counterclockwise pressure and feel significant resistance, do not force the turn. Excessive torque can spin the entire internal ceramic socket, ripping the supply wires off the fixture terminals behind the wall.
Take a small flathead precision screwdriver. Gently insert the flat blade between the outer edge of the stuck metal base and the interior wall of the fixture socket. Pry the metal collar inward toward the center of the socket opening, bending the rim into an inward crease.
Repeat this at a second point along the rim to collapse the top of the cylinder inward into a partial “C” shape. By breaking the circular tension of the metal cylinder, you relieve the friction lock against the socket threads. You can then grab the folded metal with regular pliers and easily unwind the base.
Post-Extraction Inspection and Prevention
Before screwing in a new bulb, take a moment to inspect and prep the socket.
Examine the small brass contact tab located in the deep center of the socket. Over years of use, overtightening bulbs can flatten this tab against the bottom of the casing, preventing it from making contact with a new bulb. Using an insulated screwdriver or wooden dowel—while the power is still off—gently pry the tab upward by roughly two millimeters to restore its spring tension.
Use a dry cloth or a burst of compressed air to clear any lingering glass dust or metal flakes from the socket well.
To prevent future seizing, apply a tiny dab of dielectric grease or bulb lubricant to the threads of the replacement bulb before installation. When putting the new bulb in, turn it only until it makes firm contact with the center pin. Light bulbs require gentle seating; over-tightening guarantees that the next replacement will be just as difficult.
What is your reaction?
Excited
0
Happy
0
In Love
0
Not Sure
0
Silly
0